In this tutorial I have used Paint Shop Pro v10.03 which is not the latest version I know but this version does everything I need.
The current version Corel PaintShop Photo Pro X3 (PC DVD)
Corel Paint Shop Pro X has some functions that you may find of use and thought I would share them with you. There are two functions I use often these are Scripts and Batch Processing.
I use these to process hundreds of time-lapse sequence photographs that I have taken with a digital camera. The most common process that I need to perform on all of the photographs is to crop them to 16:9 ratio and make resize them to 1280 x 720 pixels.
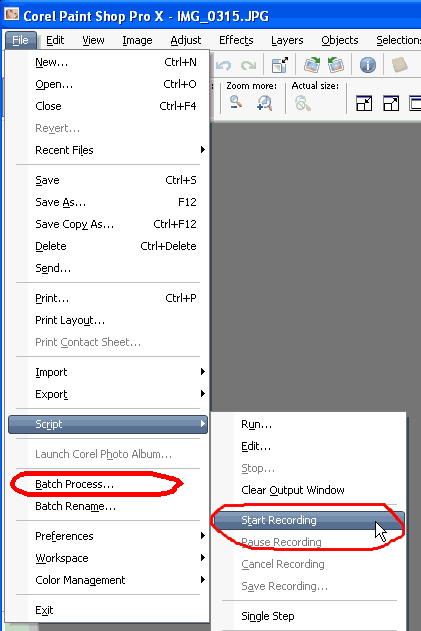
Hidden away in the File menu (see image below) is an option called Script, goto this and there is one called start Recording.

Once you click on this everything that you do to an image from now on will be recorded and can be played back to repeat what you have done to another image. Because its a recording it means it will replicate all actions the same, time and time again.
As an example lets say you have a lot of images 1600 x 1200 pixel photographs ready to process for use in a Youtube HD video. You will need to open the first image in PSPX, Select Start recording from the menu. Resize the width to 1280 pixels and click ok. This will make the image 1280x960 pixels (as it was taken with a digital camera).
Now goto the crop tool and type in 1280 for the width and 720 for the height. Move the crop rectangle up and down until you select a suitable area that you want to use and commit the crop.
You now have an image that is 1280x720 pixels (YouTube HD video frame ratio).
Now goto the Script menu option and select Save Recording and save the script you have just recorded into the scripts-Trusted folder.
Here..
C:\Documents and Settings\yourmachine_id\My Documents\My PSP Files\Scripts-Trusted\
Give your script a suitable name such as Resize to 1280x720.PspScript
Now this script is saved it can be used on a single image at any time by just going to the script menu and selecting Run and loading the script.
Batch Processing of images.
What if we need to apply these actions to on hundreds of images?, well that’s where Batch processing comes to the rescue.
We will assume now that you have recorded your script and saved it ready for use and that you have a folder full of hundreds of photographs ready to process.
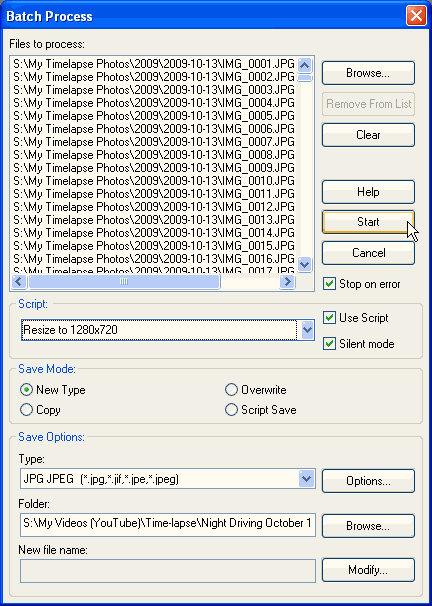
In the File menu you may have noticed that two down from the script option is something called Batch Process, click on it and it will show you the Batch Process panel as below.

What this allows you to do is run a script on a sequence of images in a folder, then save them into another folder. You have full control on which images, what script, what image type and where they get saved. In this one panel you have great control. Its worth familiarising yourself with the different areas of this panel so you understand it.
When you first go into the Batch Process panel it will be blank. So click on the Browse button and locate the images you want to process. And select them using the usual methods (i.e. Control-A to select all or Control shift to select groups of images etc). Click ok and these images will be added into the Files to Process list area.
Now enable use script and Silent mode and click on the script menu selector so it shows all the scripts available. You should see the one you recorded earlier in this list, select it.
In the Save mode area click New type, for Type select jpg jpeg
Click on Options and set the compression quality as you require it.
Now click on the Browse button and select a suitable place to save all the modified images in.
Remember this batch process will not harm your original images, it will create a duplicate set of images that have been altered by the actions that you recorded in the script.
If you are happy to start then click the Start button and watch it at work.
Paint Shop Pro has been around for many years and keeps getting better all the time.
Hope you found this of use, if so please leave a nice comment.
Thanks
Andy


No comments:
Post a Comment